Updated in June 2023
The pricing of ButtonDown evolved, the API is not part of the free plan anymore and using the technic described below should cost you around 9$/mo, see the pricing page on ButtonDown website.
The Jamstack is awesome, but things get tricky when it comes to interaction, comments, contact forms or newsletters.
Let’s tackle the latter: today we’ll set up a Newsletter on
a website generated with Hugo.
Note that the same technique should work with any static site generator.
You’re in a hurry? Browse the code and check out the demo (the backend is disabled to minimize requests). Note that some additional settings must be done in the UI, see below for details.
Updated in November 2022
Netlify just launched an email service, to connect your site with API-driven email services like Mailgun or SendGrid.
Learn more
in the documentation
The outcome
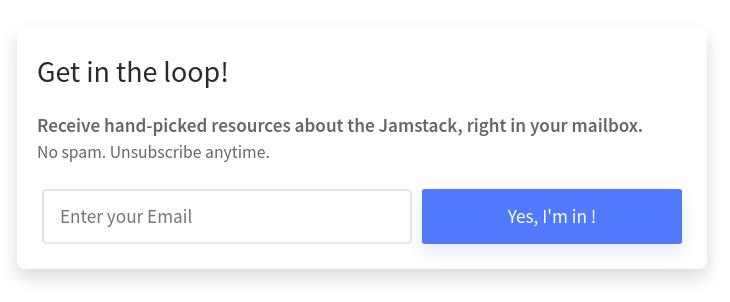
The subscription form

This is a screenshot, stop clicking like hell! See the live demo instead (and enjoy the flexbox fanciness!)
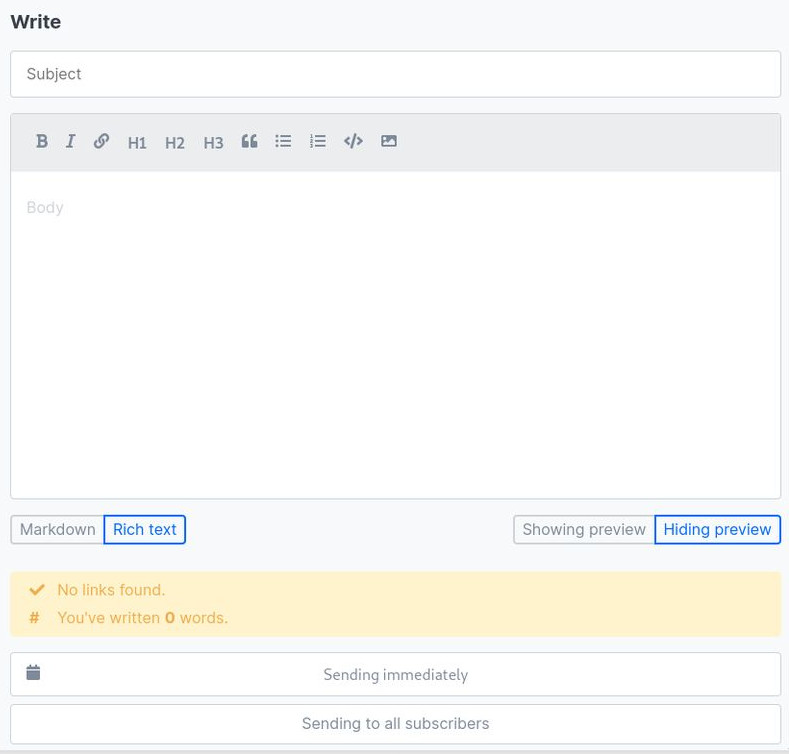
Send a new mail to your subscribers

Key features:
- write in Markdown or with a WYSIWYG editor
- Live preview
- Send a draft to yourself for review
- Dead links are automatically checked
- Custom email templates
- Schedule emails
- pretty good documentation
- privacy-friendly
- send from a custom domain for free
- the author is funding open-source projects
See the documentation for details
The stack
This solution uses ButtonDown for the newsletter and leverages the Netlify’s Forms and Serverless functions to manage the subscriptions.
Is it really free? Both services come with these generous free tiers:
- ButtonDown
is free for the first 100 subscribers.
(then it’s $9 /month for a thousand subscribers). - Netlify Forms can handle 100 free submissions each month.
We assume below that you have an account on ButtonDown and that your code is hosted at Netlify.
Let’s go!
Here are the steps we’ll follow:
- Create the submission form
- Create a Netlify Function
- Add dependencies to package.json
- Get your Token from Buttondown
- Set up the Token on Netlify
- Customize netlify.toml
- Enjoy!
1. Create the submission form
Create a file layouts/partials/newsletter.html with these lines (no edition is required):
<div class="newsletter widget">

  <div class="content newsletter-header">
    <h2 class="newsletter-title">Subscribe to our newsletter</h2>
    <p><span class="newsletter-tagline">Receive updates and insights, right in your mailbox.</span><br>
      <span class="newsletter-small"> No spam. Unsubscribe anytime.</span></p>
  </div>

  <form name="newsletter"  method="POST"   data-netlify="true" netlify-honeypot="bot-field">
    <input
    class="form-control valid"
    name="name"
    id="name"
    type="text"
    onfocus="this.placeholder = ''"
    onblur="this.placeholder = 'Enter your Name'"
    placeholder="Enter your Name"
  />
    <input
      class="form-control valid"
      name="email"
      id="email"
      type="email"
      onfocus="this.placeholder = ''"
      onblur="this.placeholder = 'Enter your Email'"
      placeholder="Enter your Email"
    />

    <input
      class="d-none"
      name="bot-field"
      placeholder="This is a spam detector, don't fill this out if you're a human."
    />

    <button type="submit" class="button">
      Yes, I'm in !
    </button>
  </form>

</div>
Tips:
data-netlify="true"allows Netlify Forms to catch the submitted datanetlify-honeypot="bot-field"enables a Honeypot provided by Netlify. The fieldname="bot-field"is the trap, and we use a placeholder to inform screen-reader users.
Then load this form anywhere
For example, in layouts/footer.html
<!-- newsletter -->
{{- partial "newsletter.html" . -}}
2. Create a Netlify Function
Create a file netlify/functions/submission-created.js:
This function may need an update, see this discussion to get details.
require("dotenv").config()

import fetch from 'node-fetch';
const { BUTTONDOWN_API_KEY } = process.env

exports.handler = async event => {
  const payload = JSON.parse(event.body).payload
  console.log(`Recieved a submission: ${payload.email}`)

  return fetch("https://api.buttondown.email/v1/subscribers", {
    method: "POST",
    headers: {
      Authorization: `Token ${BUTTONDOWN_API_KEY}`,
      "Content-Type": "application/json",
    },
    body: JSON.stringify({ email: payload.email, notes: payload.name }),
  })
    .then(response => response.json())
    .then(data => {
      console.log(`Submitted to Buttondown:\n ${data}`)
    })
    .catch(error => ({ statusCode: 422, body: String(error) }))
}
Note: we’ll set up the BUTTONDOWN_API_KEY later in the UI.
3. Add dependencies to package.json
npm install --save dotenv
npm install --save node-fetch@2
Note that using node-fetch breaks things (See below in
the Troubleshooting section). Use node-fetch@2 instead.
Commit the changes made in package.json. As an example,
here is how this commit looked like for
jamstack.club.
4. Get your secret Token from Buttondown
Netlify needs a secret Token to push the data to the ButtonDown API.
You can get this Token from the ButtonDown interface in Settings → API
Keep this token private!
Anyone with this secret can access the list of your subscribers and publish emails on your behalf.. Do not commit this secret in a public repo!
5. Set up the Token on Netlify
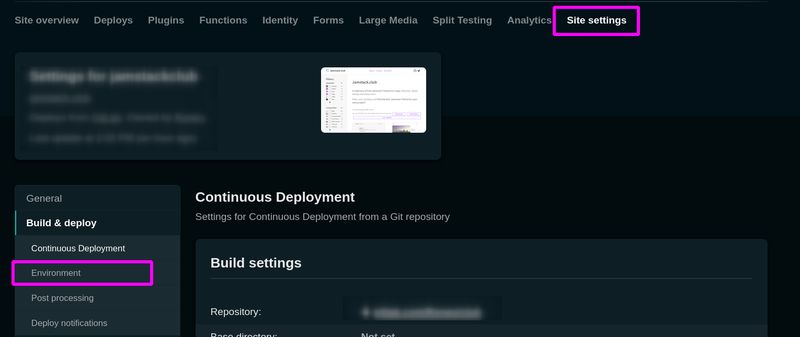
Go to Site settings → Build & deploy → Environment

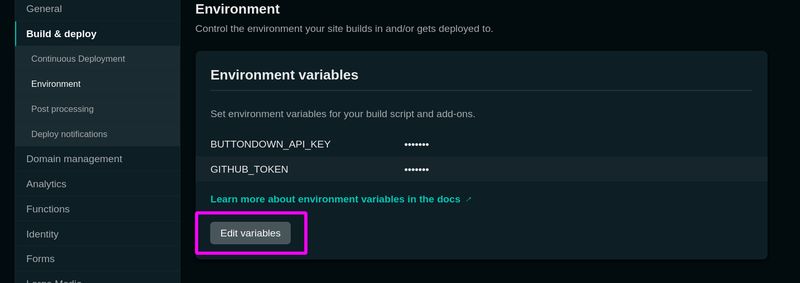
In the section “Environment variables”, click on “Edit variables”

Add a “New variable” called BUTTONDOWN_API_KEY and enter your Token.
Save.
(Note that a new deploy is required to activate these changes)
6. Customize netlify.toml
The config file depends on your project, here is an example:
[build]
  command = "npm install && hugo --minify"
  publish = "public"

[functions]
  node_bundler = "esbuild"
See the official documentation and the Troubleshooting section below to learn more.
7. Enjoy!
You can now test and tweak the Buttondown settings and wait for your first subscribers.
Check out the Buttondown documentation to discover the innumerable features.
Troubleshooting
node-fetch complains: “You are not able to import it with require()”
The original method leads to this error:
node-fetch from v3 is an ESM-only module - you are not able to import it with require()
This is fixed with node_bundler = "esbuild" and switching to node-fetch@2 -
Source
Here is the full error message for indexation (click to expand)
undefined ERROR Uncaught Exception { “errorType”: “Error”, “errorMessage”: “Must use import to load ES Module: /var/task/node_modules/node-fetch/src/index.js\nrequire() of ES modules is not supported.\nrequire() of /var/task/node_modules/node-fetch/src/index.js from /var/task/functions/submission-created.js is an ES module file as it is a .js file whose nearest parent package.json contains "type": "module" which defines all .js files in that package scope as ES modules.\nInstead rename index.js to end in .cjs, change the requiring code to use import(), or remove "type": "module" from /var/task/node_modules/node-fetch/package.json.\n”, “code”: “ERR_REQUIRE_ESM”, “stack”: [“Error [ERR_REQUIRE_ESM]: Must use import to load ES Module: /var/task/node_modules/node-fetch/src/index.js”, “require() of ES modules is not supported.”, “require() of /var/task/node_modules/node-fetch/src/index.js from /var/task/functions/submission-created.js is an ES module file as it is a .js file whose nearest parent package.json contains "type": "module" which defines all .js files in that package scope as ES modules.”, “Instead rename index.js to end in .cjs, change the requiring code to use import(), or remove "type": "module" from /var/task/node_modules/node-fetch/package.json.”, “”, " at Object.Module._extensions..js (internal/modules/cjs/loader.js:1015:13)", " at Module.load (internal/modules/cjs/loader.js:863:32)", " at Function.Module._load (internal/modules/cjs/loader.js:708:14)", " at Module.require (internal/modules/cjs/loader.js:887:19)", " at require (internal/modules/cjs/helpers.js:74:18)", " at Object.Still stucked?
Here are a few places to get more info:
- the Deploys logs https://app.netlify.com/sites/YOUR-SITE-NAME/deploys
- Forms submissions logs: https://app.netlify.com/sites/YOUR-SITE-NAME/forms
- Functions logs: https://app.netlify.com/sites/YOUR-SITE-NAME/functions/submission-created
- The Netlify forums: https://answers.netlify.com
Roadmap
- Turn this into a Shortcode for Hugo
- Redirect to a custom page on subscription. See CSS-Tricks and https://answers.netlify.com/t/personalize-thank-you-page-redirect-through-params-from-fields/50926
- Write a chapter about microservice architecture and AWS (the host of Buttondown and Netlify AFAIK)
Something to improve?
You’re stuck somewhere, or found an issue? You successfully implemented this guide?
Please take a few minutes to
drop me an email or leave a comment below.
I love to receive messages, each one gets an answer and every contributors will be acknowledged right here!
Acknowledgements
- Aashni Shah for the original article.
- Coel May for this time-saving post on Netlify’s forums.
- Justin for running ButtonDown
- The cover illustration is by David Revoy from Pepper & Carrot. Their work is licenced under CC-BY – Go support their creations!